Tuesday 30 August 2016

Star Stitch Success!

I love star stitch but never managed to get it quite right but at last I've succeeded while making the second square of The Last Dance On The Beach CAL.  The great thing about this whole process is the video tutorial by Esther for each one of the squares...


I managed to turn out a perfect square, however getting the sizing right wasn't as simple because one of the downfalls of using stash yarn is two different brands of the same thickness yarn will not come out the same size. As I mentioned before I'm usuing Aran yarn which is working up like a chunky, however the yarn I used for this square is labelled Aran and works up like an Aran so I had to increase my hook size considerably to get a ten inch square.


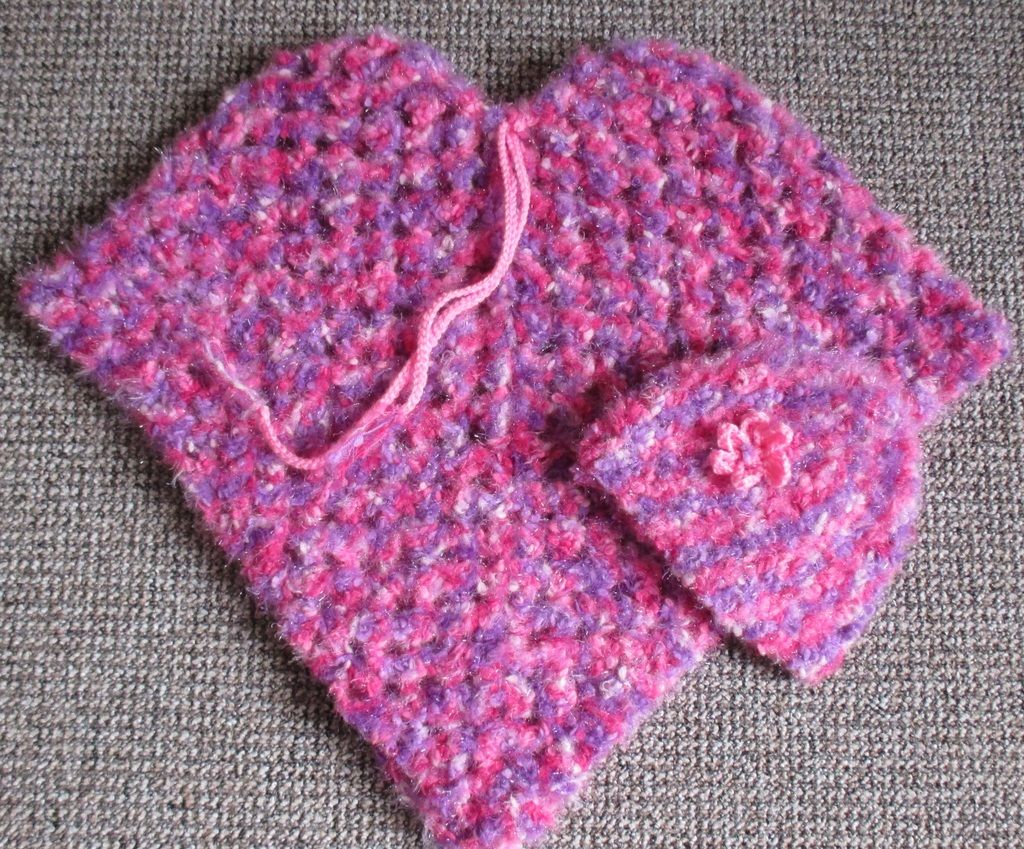
This square was designed by Kirsten from Haahmaarraak.nl and I love it.  I'm really regretting not following this CAL as it was unfolding but at least all the patterns for each square are still there for us to follow as and when we like.
You can find the pattern for this square along with the video tutorial here 

This CAL has quite taken over my life I'm enjoying it so much because a square works up quickly and as I'm only making three of each  I'm not getting bored and can't wait to start on the next one.

It's been fun seeing your finished blankets too and I'm so glad Ive inspired some of you to join me, I'm looking forward to seeing everyone's squares as they unfold

A note to self for future reference and for anyone living in or visiting the UK ...
Poundstretcher Aran yarn works up like chunky, Aldi Aran yarn works up like Aran.

Thank you for the great response from my last post you are all lovely for taking the time to give me your advice about choosing a camera.  I will look into all the camera's you have suggested before I make my decision.  

Have a great week.


 photo e69a549e-0e33-465a-b88b-a6ebe916eaaa_zps34480328.jpg

Sunday 28 August 2016

Advice Please.

I need a new camera, I'm ashamed to say that I have been using my phone's camera over the past year and it gives beautiful clear pictures but they aren't ideal, close ups are usually blurred and it heats up alarmingly. 

The thing is I'm no photographer and I haven't got a clue about cameras and to be honest how to use them effectively.  I see such beautiful pictures on some of your blogs, how do you do it? and most importantly what type of camera do you use? 

Anything complicated would be too much for my befuddled brain but any suggestions tips or advice would be gratefully appreciated.

Leaving you with some phone camera shots of flowers from my garden.....


How can you tell that roses are my favourite flower. :) 

Have a great day. xx


 photo e69a549e-0e33-465a-b88b-a6ebe916eaaa_zps34480328.jpg

Tuesday 23 August 2016

Last Dance On The Beach.


As regular readers of my blog will know I'm a great fan of crochet/knit alongs, you will have noticed however that I haven't followed one for a while in fact I think the last one I did was the Cheerful Child Blanket which I finished back in February.  I've had other things to occupy me challenges to be met, requests from various charities for things in need but throughout all this I have been keeping my eye out for the perfect man blanket for a friend and have given all CALs no more than a glance until now.

This one in particular has touched my heart because it was the last design from our dear blogging friend Wink from A Creative Being.  I knew that she had been working on this before she passed and her blog friends came together to complete this beautiful Last Dance On The Beach CAL in her memory and I think that they have done her proud.  

The CAL is now over and the finished blankets are appearing en masse on Facebook and they are beautiful. I have decided to make one for my friends birthday because this will be a lovely blanket for anyone, every single block is special. I have until February to complete this so there's no rush.

here is the square from week one ....


This was designed by Esther from Happy In Red and it's a lovely easy block, I'm making two of these.

I have several balls of Poundstretcher yarn in my stash  it's labelled as Aran but it works up like chunky and I have added a few balls of stylecraft special chunky to the mix, I have to play around with hook sizes to get the correct size but it is working so far. 
This one was made with poundstretcher yarn in olive green and I used a 5.50 mm hook and it's turned out at ten inches square.

You can find all the information and all the patterns here

Has anyone else done this CAL I would love to see your blanket ot squares and would anyone like to join me? I plan on making a set of three squares each week.  It would make a great Christmas gift.


Dailier's from my garden.


 photo e69a549e-0e33-465a-b88b-a6ebe916eaaa_zps34480328.jpg

Friday 19 August 2016

Something for the weekend.

Usually my something for the weekend posts consist of a small crochet or knitted item that can be made up over a few hours but this time it's all about these little balls...


I have a terrible sweet tooth, my downfall is biscuits, cake and chocolate in no particular order, I'm one of those people who just has to eat something sweet with my cup of tea or coffee and as a result the tummy just keeps getting bigger and bigger, so when I saw these little energy balls I just had to give them a try, there's no cooking either and every single ingredient can be classed as healthy apart from the salt which I didn't add. I would think that you could easily use any type of dried fruit I used half figs half dates. They taste amazing and I find that eating just one of these is enough. 

I took samples into work today and my work colleagues loved them too. The recipe is from Deliciously Ella's website if you haven't heard about Ella before you can read her story here and you can find the recipe here.

Enjoy and have a great weekend. 


 photo e69a549e-0e33-465a-b88b-a6ebe916eaaa_zps34480328.jpg

Saturday 13 August 2016

Three Colour Ripple Baby Blanket

Thank you for your lovely comments about my baby ripple blanket and the requests for the how to, you can see the original post here. I'm sorry it took a while but here it is at last....


It's amazing how many variations of the ripple or chevron pattern there are.  Once you have mastered the art of rippling it's really very easy.  The pattern for the three colour ripple baby blanket is the easiest of all because apart from the beginning and end of each row it's all made in three's...

Three colours, which I think is the best combination of all because you can carry your yarn up the side of your work and then hide it with your border so there are no ends to weave in.

You can make your blanket with any thickness of yarn you wish just use the corresponding hook size, I used baby DK and a 4.50 hook.

My finished blanket measured 44"x44" and it took 430 grams of yarn.

I have written this with UK terminology here is a conversion chart....


I'm a big fan of simple I hate complicated or fiddly especially when you want to make something in a hurry, so I never count my starting chain I just chain away until I have the length of blanket I want and then I make half as many chains again sometimes even more, I can can get quite carried away with the chaining in fact it's quite soothing chaining away but better too many than not enough. When you are working the first row keep measuring until it's the width you want and then just cut off your excess chains leaving a tail of a few chains to pull out and weave in at the end.

Those who need a chain count make a swatch of 21 chains + 3 and measure the width, you can then work out how many chains you will need then add three more for your starting chain.


Remember to have 2 trebles (the first treble will be the 3 starting chain) at the start and end of each row then it's..

Three trebles down to the valley,
Three trebles crocheted together over three stitches for the valley
Three trebles up to the top
Three trebles in one stitch for the peak.

for the first row treble in fourth chain.

I hope these pictures explain it better than long drawn out instructions read them from left to right....


To complete the blanket you need to decide whether or not you want to straighten the wavy edge at the top and bottom of your work, if you want to leave it as it is just work three rows of dc around the blanket and then a final round of  reversed dc or crab stitch. I think it looks nice wavy but for this particular blanket I straightened the edge.....

ch 1 turn, dc in same place as ch1, 1dc,2htr, 3tr, 2htr
you are heightening the stitches from the previous row to make them all level.

3dc, 2htr,3tr,
2htr, 3dc in corner and 2dc in each colour down the side.

repeat for the bottom edge 

then two dc in each colour up side edge to the top finishing with 3 dc in the corner


work two more rounds of dc with 3dc at each corner and finish with a final round of reversed dc or crab stitch


I hope that this tutorial was helpful for those of you who are beginner crocheters or ripplers it can be confusing until you get the hang of it but once you do I can assure you you will love it.  If it's still not clear or if you need any more help just ask.

You can find another simple ripple pattern here just keep going to make it into a blanket.

Find a print friendly version of this pattern here

Now that you have completed this one why not try another one of my free baby blanket patterns, just click on the links below.


photo e69a549e-0e33-465a-b88b-a6ebe916eaaa_zps34480328.jpg

Sunday 7 August 2016

Stash-Buster Party Fifteen

Welcome to your Summer stash party! I hope that everyone is having a lovely Summer and that you are managing to bust some stash. Summer is the ideal time for making small projects and using up some of your little bits of leftover yarn.

This Link Party will be open right through August and I would love to see what you have been up to, so link up your lovely makes and pass along some inspiration.

A huge thank you to all of you who participated in the last link up there were some fabulous projects, these were your favourites....


Janet's beautiful stash-busting makes
Libby's lovely poncho (LH)

Anabelia's pretty mandala's
Congratulations ladies!


Stash-Buster Party Fifteen


Rules

  • Please grab the stash-buster link party button
  • All crafts are welcome either complete or works in progress.
  • Link the picture from your actual post and not your blog address.
  • Be polite and click on at least 2 links and leave some nice comments
  • Please mention the link party in your post or display the party button in your sidebar if you want to be featured.
Happy Linking!


Any LH pictures are projects made by ladies who are members of Loving Hands, clicking on the picture will show you an enlarged version, if you would like any information about any of the projects shown please just ask in the comments section. 


 photo e69a549e-0e33-465a-b88b-a6ebe916eaaa_zps34480328.jpg

Monday 1 August 2016

Someone Else's Turn

Just for a change I thought it would be nice to show you some of the beautiful things my loving hands group make.  We meet up once a month and they leave their lovely creations with me so that I can eventually box them up and send them on to the appropriate charity.....

Maureen makes the most beautiful things, sometimes I wonder how she can bear to part with them here is a blanket she made in less than a month...


This was made with Aran yarn and is a easily big enough for a single bed you can find the pattern here
As if that wasn't enough she made this lovely little sleeping bag too...


Sure to keep a little one warm and snug. 

This is Mary's version of the same blanket above...


you would be forgiven for thinking she must have had enough of blanket making but because she enjoyed making it so much she is already hooking another one for her son.


Cute little hats made by Jan


Hats, booties and blanket squares made by the ladies from Mary's church


A lovely baby cardigan made by Barbara....


What are you all up too? I can't believe how quiet it is in blogland just now, hopefully everyone is enjoying the Summer.  I will be back soon with the three colour ripple blanket how to. :) 

You can find out more about Loving Hands and see more of my groups creations here


If you would like any information about any of the items shown please just ask in the comment section. 


 photo e69a549e-0e33-465a-b88b-a6ebe916eaaa_zps34480328.jpg